In a world where dessert often steals teh show, sometimes the smallest treats leave the biggest impressions. Enter the mini cheesecake cup – a petite powerhouse of creamy indulgence, crisp crust, and endless flavor possibilities. These perfectly petite delights aren’t just adorable; they’re a masterclass in balance,combining rich textures and sweet tangs into a single,bite-sized wonder. Whether you’re hosting an elegant soirée, looking for an easy-to-share dessert, or simply craving a mini escape to cheesecake heaven, these irresistible mini cheesecake cups offer a delightful solution. Join us as we dive into the art of crafting these charming confections – where simplicity meets sophistication, and every tiny cup promises a moment of pure bliss.
Perfectly Petite: How to Make Irresistible Mini Cheesecake Cups is a delightful journey into crafting bite-sized desserts that balance creamy indulgence with crisp, flavorful crusts. There’s somthing magical about these mini cheesecake cups-a nostalgic elegance in their petite size combined with an artful harmony of tastes and textures. Whether served at a cozy gathering or as an elegant treat, mastering this recipe lets you impress effortlessly.
Prep and Cook Time
- Preparation: 20 minutes
- Baking: 18 minutes
- Chilling: 4 hours (or overnight for best texture)
yield
12 mini cheesecake cups
Difficulty level
Medium – Requires basic baking skills and patience for chilling
Ingredients
- For the Crust:
- 1 ½ cups graham cracker crumbs (or digestive biscuits, finely crushed)
- 3 tablespoons unsalted butter, melted
- 2 tablespoons granulated sugar
- Optional: ½ teaspoon ground cinnamon or zest of 1 lemon for flavor twists
- For the Filling:
- 16 oz (450g) cream cheese, softened to room temperature
- ¾ cup granulated sugar
- 1 large egg, at room temperature
- 1 teaspoon pure vanilla extract
- 2 tablespoons sour cream (for silkiness)
- Garnishes:
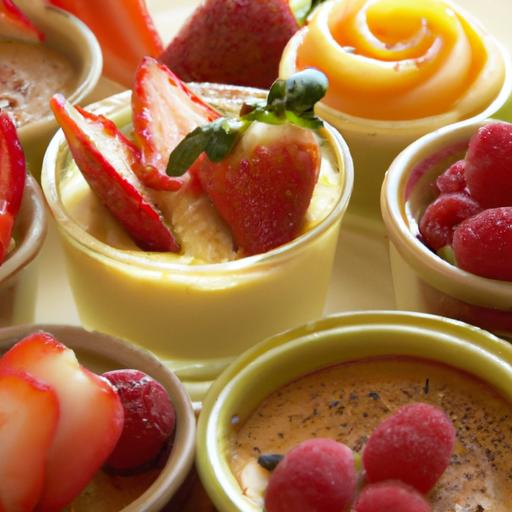
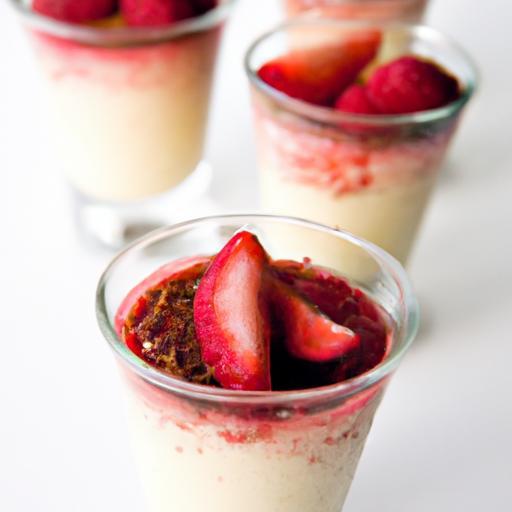
- Fresh berries (blueberries, raspberries, sliced strawberries)
- Mini chocolate shavings or curls
- Edible flowers or mint leaves
- Fruit compotes or curds (lemon, raspberry)
Instructions
- Prepare the crust: In a medium bowl, combine graham cracker crumbs, sugar, and cinnamon or lemon zest (if using). Pour in the melted butter and stir untill crumbs are evenly moistened and hold shape when pressed. Press approximately 1 tablespoon of crust mixture into the bottom of each mini cupcake liner or silicone mold to form a firm base.
- Make the filling: Beat the softened cream cheese in a large bowl on medium speed until entirely smooth and creamy, about 2-3 minutes. Add sugar gradually and continue beating until combined and silky.
- Add egg and flavor: Crack in the egg, than add vanilla extract and sour cream. Beat on low speed just until incorporated-avoid overmixing to prevent cracks.
- Fill cups: Spoon or pipe the cheesecake filling evenly over each crust-lined cup, filling about ¾ full. Smooth tops gently with the back of a teaspoon to create an even surface.
- Bake: Place the mini cups on a baking sheet and bake at 325°F (160°C) for 16-18 minutes. The centers should be slightly jiggly but set at the edges.
- Cool and chill: Let the cupcakes cool in their pan for 30 minutes, then transfer to the refrigerator for at least 4 hours, ideally overnight, to develop that signature silky texture.
- Garnish and serve: Just before serving, top each mini cheesecake with fresh berries, a light dusting of powdered sugar, or a curl of chocolate. Mint leaves or edible flowers add vibrant color and refinement.
Tips for Success
- Room temperature ingredients: Ensure the cream cheese and egg are at room temperature. This makes the filling incredibly smooth and helps avoid lumps.
- Don’t overbeat: Overmixing can incorporate too much air,causing fissures in the filling. Beat just until combined for a silky finish.
- Crust alternatives: For a nutty variation, swap graham crackers for finely chopped pecans or almonds mixed with a dash of brown sugar and butter.
- Make-ahead magic: Mini cheesecake cups keep well in the fridge for up to 3 days and freeze beautifully-wrap tightly to prevent freezer burn.
- Prevent soggy crust: For crispier bases, pre-bake crusts for 5 minutes or brush with melted chocolate before adding filling.
Serving Suggestions
These mini cheesecake cups shine as centerpiece desserts for afternoon teas, bridal showers, or as charming bites at cocktail parties. Pair them with a light dusting of powdered sugar or a drizzle of homemade fruit coulis to brighten flavors. A dollop of freshly whipped cream balancing tart berries offers contrast that makes each bite mesmerizing. For a festive touch, sprinkle edible gold flakes or finely grated citrus zest atop the garnishes.
Consider plating on a decorative slate or tiered serving tray, adding freshness with sprigs of mint or delicate orchid blossoms. The real magic lies in how the interplay between the crisp crust, the velvety filling, and the vibrant garnishes can tell an irresistible story-one that invites repeat indulgence.
Nutritional Details
| Per Mini Cup | Calories | Protein | Carbs | Fat |
|---|---|---|---|---|
| Mini Cheesecake Cup | 190 kcal | 4 g | 18 g | 11 g |

Explore more creamy delights and recipes for small batch desserts in our article on Ultimate Small Batch Desserts, or dive into expert baking tips at King Arthur Baking’s Cheesecake Guide.
Q&A
Q&A: Perfectly Petite – How to Make Irresistible Mini Cheesecake Cups
Q1: What makes mini cheesecake cups so irresistible?
A1: the magic lies in their perfect bite-sized charm-each mini cheesecake cup delivers a creamy, luscious experience without the guilt of a large slice. Their dainty form invites indulgence, making them ideal for parties, gifts, or anytime you crave a sweet treat that feels special yet manageable.Q2: how do I achieve the perfect crust for mini cheesecake cups?
A2: The key is finely crushed cookies-graham crackers or digestive biscuits work wonders-mixed with melted butter until it resembles wet sand. Press the mixture firmly but gently into the bottom of your mini molds or cupcake liners. A compact crust ensures a buttery crunch that holds up beautifully against the creamy filling.
Q3: Can I customize the filling to suit different tastes?
A3: Absolutely! The classic creamy cheesecake filling starts with softened cream cheese, sugar, and a touch of vanilla extract. From there, let your imagination run wild-add lemon zest for a citrus twist, fold in fresh berries, swirl in chocolate or caramel, or even experiment with pumpkin spice for seasonal flair. Remember, small batches mean swift creativity!
Q4: What’s the best baking method for mini cheesecakes?
A4: Baking mini cheesecakes in a water bath (bain-marie) helps regulate heat and prevents cracking, resulting in silk-smooth textures. Simply place your muffin tin inside a larger pan filled with hot water about halfway up the sides. And don’t forget to bake gently at a low temperature for that perfect creamy consistency.
Q5: How should I garnish mini cheesecake cups to make them eye-catching?
A5: Since these cuties are all about presentation, toppings are your best friend! Fresh fruit, a sprinkle of crushed nuts, a dollop of whipped cream, or a drizzle of chocolate ganache can transform your mini cheesecakes from simple to stunning. Try edible flowers or a dusting of powdered sugar for a touch of elegance.
Q6: Can mini cheesecake cups be made ahead of time?
A6: Yes! they actually benefit from chilling. Refrigerate your mini cheesecakes for at least 4 hours or overnight to let the flavors meld and the texture firm up. Just keep them tightly covered to preserve freshness and prevent any fridge odors from sneaking in.
Q7: What’s a pro tip for making mini cheesecakes without mini pans?
A7: No mini muffin tin? No problem! Use silicone cupcake liners set on a baking sheet or even small ramekins. Another fun option is clear plastic dessert cups for no-bake versions, perfect for layering flavors and creating beatiful mini parfait-style cheesecakes.
Q8: How do mini cheesecake cups fit into different occasions?
A8: Their petite size makes them the ultimate party pleaser-from bridal showers and birthday parties to holiday gatherings and afternoon teas. They’re elegant finger food with a creamy punch, easy to serve and impractical to resist. Plus, guests love the personalized touch of a miniature dessert tailored to their taste.
Q9: What’s the secret to preventing cracks on mini cheesecakes?
A9: Keep your batter smooth, avoid overmixing, and bake low and slow. Using a water bath is a game-changer for even heat distribution. After baking, let the cheesecakes cool gradually in the oven with the door cracked open before chilling. This gentle handling reduces sudden temperature shifts that cause cracking.
Q10: Why choose mini cheesecake cups over traditional slices?
A10: Mini cheesecake cups combine indulgence with portion control, making dessert both fun and approachable.They allow for diversity-you can offer multiple flavors in one sitting without overwhelming your guests. Plus, their eye-catching presentation turns every bite into a delightful little party!
Dive into your kitchen adventure with these petite powerhouses, and you’ll see why mini cheesecake cups are the next big thing in irresistible desserts!
Wrapping Up
Whether you’re hosting a cozy gathering or simply craving a sweet escape, these perfectly petite mini cheesecake cups are your passport to indulgence without the guilt. Their creamy layers and crumbly crusts offer a delightful bite-sized experience that’s as charming to look at as it is irresistible to savor. So next time you want to impress with minimal fuss, remember: big flavor often comes in small packages. happy baking, and may your mini masterpieces bring joy one luscious bite at a time!