
There’s something irresistibly comforting about a creamy, luscious pudding-an age-old dessert that sparks nostalgic memories with every spoonful. Whether enjoyed as a swift afternoon treat or teh grand finale to a family dinner, homemade pudding cups offer a delightful blend of simplicity and flavor that’s hard to beat. In this article, we’ll explore a collection of easy-to-make pudding recipes that transform everyday ingredients into enchanting little cups of joy. From classic chocolate and vanilla to inventive twists bursting with fresh fruits and spices, prepare to unlock the secrets to crafting flavorful homemade pudding cups that invite you to slow down, savor, and smile.
Delicious homemade pudding cups offer a delightful balance of creamy texture and vibrant flavor, perfect for satisfying your sweet tooth any time of day. Drawing inspiration from timeless classic recipes and imaginative modern twists, this guide reveals how to select the perfect ingredients, master the pudding’s consistency, and elevate presentation to create truly irresistible desserts.
Prep and Cook Time
- Prep Time: 15 minutes
- Cook Time: 15 minutes
- Chilling Time: 2 hours (minimum)
Yield
4 individual pudding cups
Difficulty Level
Easy
Choosing the Perfect Ingredients for Creamy and Flavorful Pudding
Starting your delicious homemade pudding cups begins with selecting fresh, high-quality ingredients that harmonize beautifully to create a luscious, silky texture and a rich, balanced flavor. For the base, whole milk or heavy cream delivers that indulgent creaminess, while using pure vanilla extract or fresh vanilla bean elevates the aroma and depth. When opting for chocolate variations,choose at least 60% cocoa dark chocolate or premium cocoa powder to achieve an intense yet smooth chocolate experience.
Don’t underestimate the magic of cornstarch-it acts as the thickening agent to transform your liquid ingredients into a perfectly creamy pudding. To add unique flavor profiles, consider natural sweeteners like honey, maple syrup, or coconut sugar rather than refined white sugar, giving each spoonful a nuanced sweetness.
Step-by-Step Guide to Crafting Classic and Unique Pudding Variations
- Combine dry ingredients: in a medium saucepan, whisk together sugar, cornstarch, and a pinch of salt to ensure even thickening.
- Add liquid components: Gradually whisk in cold milk or cream to create a smooth, lump-free base.
- Cook over medium heat: Stir continuously as the mixture heats until it begins to thicken and bubble – this usually happens around 8-10 minutes.
- Incorporate flavorings: Remove from heat, than stir in your flavor choice, such as vanilla extract or melted dark chocolate, blending until silky smooth.
- Cool and set: Pour pudding into individual cups or ramekins. Cover the surface with plastic wrap to prevent a skin from forming and chill for at least 2 hours before serving.
- For creative twists: try adding pureed fruit (like mango or raspberry) after cooking for fruity layers, or swirl in a spoonful of peanut butter or matcha powder for unique flavor bursts.
Tips and Tricks to Achieve the Ideal Texture Every Time
- Constant stirring: Prevent lumps by whisking continuously once liquid hits the pot – patience here is key!
- Temp control: Use medium heat to avoid curdling and burning at the bottom.
- Strain if needed: For ultra-smooth pudding, pass your finished mixture through a fine mesh sieve before chilling.
- Plastic wrap touch: Press plastic wrap directly onto the pudding surface while cooling to keep a glistening, skin-free top layer.
- Adjust consistency: Thinner pudding? Add a bit more milk after cooking and mix well. Too thick? Warm gently and whisk in a tablespoon of milk at a time.
Creative toppings and Presentation Ideas to Elevate Your Pudding Cups
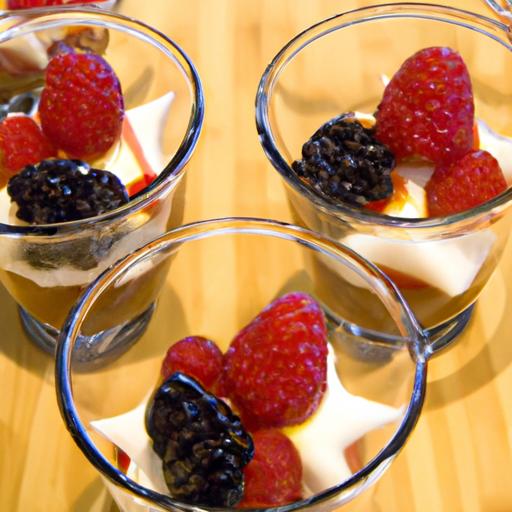
Enhance your delicious homemade pudding cups with vibrant garnishes and textures that delight the eye and palate. Consider a swirl of whipped cream crowned with crushed toasted nuts like pistachios or almonds for crunch contrast. Fresh berries such as blueberries or sliced strawberries add brightness and tang. Drizzling a touch of caramel or a sprinkle of flaky sea salt imparts luxurious notes that elevate every bite.
For a refined presentation,layer pudding with cookie crumbs or granola at the bottom of clear glass cups and alternate depths with pudding and fruit. Edible flowers or a delicate dusting of cocoa powder create a café-worthy finish. Using ramekins, mason jars, or mini trifle glasses offers charming, portion-controlled servings perfect for gatherings.
Ingredients
- 2 cups whole milk (or substitute 1 cup heavy cream + 1 cup milk for extra creaminess)
- ⅓ cup granulated sugar (or ¼ cup honey/maple syrup for natural sweetness)
- 3 tablespoons cornstarch
- 1 pinch salt
- 2 teaspoons pure vanilla extract or seeds from 1 vanilla bean pod
- Optional flavor additions: ½ cup melted dark chocolate, ¼ cup pureed fruit, 1 tablespoon matcha powder, or 2 tablespoons peanut butter
Instructions
- Whisk dry ingredients: In a saucepan, mix sugar, cornstarch, and salt until combined.
- Add milk slowly: Pour milk into the dry mixture gradually, whisking to maintain a smooth consistency.
- Heat and thicken: Place saucepan over medium heat and stir frequently until mixture bubbles and thickens, about 8-10 minutes.
- Flavor infusion: Remove from heat and stir in vanilla extract or any optional flavorings until fully incorporated.
- Strain (optional): Pour pudding through a mesh strainer into a bowl for extra smoothness.
- Chill properly: Transfer pudding into cups, cover with plastic wrap touching the surface, and refrigerate for 2+ hours until set.
- Serve with your favorite toppings and enjoy a creamy, silky dessert.
Tips for Success
- For lactose-free pudding, use almond or oat milk and a non-dairy cream alternative; adjust thickener as needed.
- To speed chilling, place pudding cups in an ice bath after cooking before refrigerating.
- Swap cornstarch for arrowroot powder for a gluten-free, cleaner flavor option.
- Make-ahead friendly: pudding can be refrigerated for up to 3 days, but garnish fresh to preserve textures.
- For a vegan pudding version, follow this recipe using coconut milk and natural sweeteners; learn more about vegan pudding variations.
Serving Suggestions
Layer pudding with crumbled graham crackers or gluten-free cookies for textural contrast. Top with whipped coconut cream and colorful berries or edible flower petals to transform simple cups into elegant desserts perfect for dinner parties. A sprinkle of toasted coconut flakes or chopped roasted nuts adds a satisfying crunch while a gentle drizzle of honey or caramel intensifies sweetness and visual appeal.
| Nutrition per Cup | Calories | Protein | Carbs | Fat |
|---|---|---|---|---|
| Classic Vanilla Pudding | 210 kcal | 6g | 32g | 6g |
| Chocolate Variation | 240 kcal | 6g | 34g | 8g |

For more dessert inspiration, explore our guide on Easy Chocolate Desserts that perfectly complement pudding cups.
Q&A
Q&A: Delicious Homemade Pudding Cups – Easy recipes to Savor
Q1: What makes homemade pudding cups better than store-bought ones?
A1: Homemade pudding cups offer the unbeatable charm of freshness and control over ingredients. You can tailor the sweetness, choose natural flavors, and avoid preservatives or artificial additives. Plus, they’re a fun, customizable treat that turns a simple dessert into a personal delight!
Q2: Which puddings are easiest to make for beginners?
A2: classic vanilla and chocolate puddings are great starting points-they require minimal ingredients like milk, sugar, cornstarch, and flavor extracts. Their straightforward process helps build confidence before trying more adventurous flavors such as matcha, coconut, or seasonal fruits.
Q3: Can I prepare pudding cups ahead of time?
A3: Absolutely! Pudding cups can be made a day or two in advance and kept refrigerated.This actually helps the flavors meld and the texture achieve that perfect, creamy consistency. Just cover them tightly to prevent any fridge odors sneaking in.
Q4: How can I make pudding cups more exciting without complicating the recipe?
A4: Add fun layers or toppings! Consider layering puddings with crushed cookies, fresh berries, whipped cream, or toasted nuts. Even a drizzle of caramel or a sprinkle of cinnamon elevates the experience while keeping the process simple.
Q5: Are there dairy-free options for homemade pudding cups?
A5: Yes, you can easily swap milk for almond, coconut, oat, or soy milk without losing creaminess. Coconut milk, in particular, adds a rich texture and subtle tropical flavor that pairs beautifully with chocolate or vanilla puddings.
Q6: How do I avoid lumps and get a smooth pudding texture?
A6: Slow and steady is key! Whisk your cornstarch or other thickening agents thoroughly with a small amount of cold milk before adding to the hot milk mixture. Stir constantly while cooking over medium heat to prevent clumping and ensure a silky finish.
Q7: Can pudding cups be made kid-friendly?
A7: Definitely! Using natural sweeteners like honey or maple syrup and adding colorful fruit layers or sprinkles makes pudding cups fun and nutritious. Plus, involving kids in stirring and layering makes dessert time an interactive adventure.
Q8: Is it possible to make pudding cups without eggs?
A8: Yes, many pudding recipes rely on cornstarch, tapioca, or arrowroot as thickeners instead of eggs. this makes them perfect for those with allergies or dietary preferences, without sacrificing flavor or texture.
Q9: What’s a creative way to serve pudding cups at a gathering?
A9: Serve pudding cups in clear glass jars or mini mason jars with cute labels or twine ribbons. You can create a “pudding bar” where guests mix and match toppings and puddings, turning dessert into a playful, personalized experience.
Q10: How can I incorporate seasonal flavors into pudding cups?
A10: Tap into seasonal fruits like pumpkin in fall, fresh berries in summer, or apple cinnamon in winter. Adding spices such as nutmeg, cardamom, or ginger can also evoke the essence of the season without complicating the recipe.
Concluding Remarks
With these delicious homemade pudding cup recipes at your fingertips, dessert time just became a delightful adventure you can savor anytime. whether you prefer classic vanilla, rich chocolate, or a fruity twist, crafting your own pudding cups offers a perfect blend of simplicity and indulgence. So next time the craving strikes, remember: a creamy, customizable treat is just a spoonful away.Happy pudding making-and even happier tasting!